Hi Harrison, great news… My first paid lidar project is a 400 Acre site!
Can you give me some guidelines on how to handle that large of a project?
Thanks a bunch! Jim
Hi Harrison, great news… My first paid lidar project is a 400 Acre site!
Can you give me some guidelines on how to handle that large of a project?
Thanks a bunch! Jim
Are you able to share me a KML? Then I can give you a little more insight into flight planning.
Hey guys, I have a similiar sized site and figured I’d jump in and share a kml. One thing I have noticed is that I capture a ton of area outside my KML on my m300 using the R2A specs. Wondering if we can eliminate some of that.
Yes you can! If you go into the PCMaster application when you are post processing there is a cloud filter button. What you are going to manipulate is the angular rotation values (default is 0 and 360). As we know the Avia LiDAR sensor covers a 70 degree area.
The center point of that 70° is 270°
Start point is 235°
End point is 305°
You can shave whatever you like off of that by taking it equally from both sides. I.E. (240° and 300°) would make that 70° 60°
Hope that helps, please share your results.
Could you let me know which camera settings you are using. I would like to double check that they are correct. Also what was your flight height in this survey, and did you use terrain follow?
These settings
My flight height was 250 and no I didn’t - should I use that with the RTK? I don’t know that I have a login for RTK through our survey provider available but I can try. Speed was 15 mph.
Terrain follow is a feature of DJI Pilot for the M300. It was recently updated so that it’s fully functional. However it is not thoroughly tested as of yet, so you still want to be mindful of your height when using it.
You shouldn’t have to use RTK in order to utilize terrain follow as the DTMs are built into the world map. More info on that at a later date. Happy flying!
Thanks. Do you think my camera settings are correct? Appreciate if!
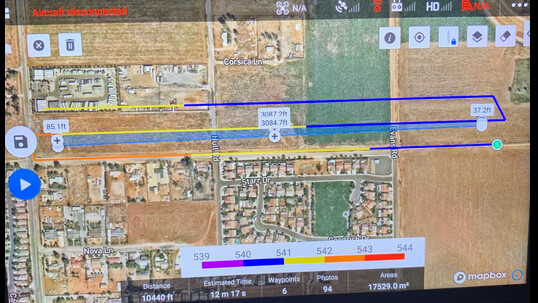
Wanted to drop in and offer this: I just flew a 400+ acre site on some really low parameters- the goal was not survey grade topo but I’ll probably still get that level of accuracy after the processing finishes from the looks of it.
I flew at 400 feet. No terrain following
20 mph
30% overlap
So far the data seems perfect for our deliverable which is “GIS Level” topo. I noticed on one side of the project a control point was .2 ft off - no big deal at all.
This is fantastic, nicely done sir! If you ever have any jobs like this that you’d be willing to share on the community please don’t hesitate to share a link.
Is this still true with updated firmware on remote and m300 rtk? I have a project that will need terrain follow.
So I still seem to need a DSM file on my SD card or on internal memory for Terrain Follow to work.
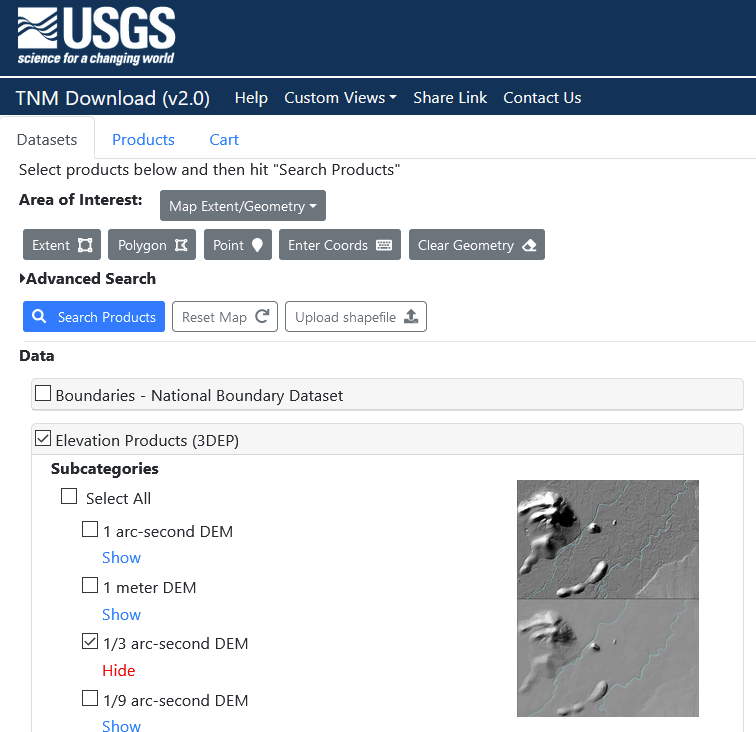
To get that
it will calc it out and give you a color spectrum on each flight line.
NOTE: I have only planned with this so far… first Terrain Following flight is early next week…  That said this is the DSM I have been using on our phantom drones (via Map Pilot).
EDIT: make sure you get an area a good bit larger than your flight area… I’d hate to think of what would happen should your drone ‘fall off’ the edge of the DSM surface… 
Nice write up @anthonyhermanklj
What do you personally use to clip your .geoTIFF file?
Don’t suppose you’d like to do a similar walkthrough for that as well?
Thanks.
Engineering firm so we use ArcGIS Pro (ESRI). Their instructions are better than what I could write (link below), the only difference being drag a kml polygon into my project and can directly reference that in CLIP or EXTRACT rather than having to draw or convert something into a .shp file. I do the same for the created Point Clouds from PC master…
I know there are free ways to do this (the raster part), but ESRI is where I first learned and have since stayed.
or I hear QGIS is free and can do this…
")
do I interpret this as all we have to do is select “Terrain Follow” feature in the Pilot/Mapping app…and we don’t have to import any DEM file?
If I’m incorrect, please supply specific steps then.
THANKS!!!
See @anthonyhermanklj post above. It gives a pretty solid explanation of how to do this.

It should show a screen like this:
Should be good from there… but sorry that’s all I can recall from memory (don’t have the drone at the moment).
Thanks! I got it all working.
So it says in remote to enable rtk before performing terrain follow. Necessary?