Recently I was able to test out the R2A Facade Mount on our M210. The mount worked flawlessly, although I may need to add some height to the landing gear as the USB Drive is slightly touching the ground when stationary. I was so used to flying NADIR that the Facade mount introduced many opportunities to capture data that I otherwise could not before. It also made me approach the structure differently as I wanted to capture all angles. When in PcMaster, you MUST change the ROCK Orientation setting. I changed the orientation to the following:
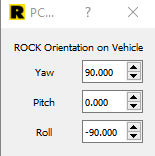
Yaw : 90.000
Pitch : 0.000
Roll : -90.000
After changing the settings, the data was displayed correctly. This example applies to the M210 RTK. Overall, battery life was not affected much by the added Payload (Mount). I can not wait to see upcoming scans and the detail the Facade can capture. I am also going to be attaching the R2A facing upwards like recently mentioned in Harrison’s latest Youtube video to capture points underneath of whatever i am scanning.
Thanks again ROCK Robotics for an awesome product!